SlimeFun Guide
Guide is fully written by Eris and edited by Kirin.
Introduction to SlimeFun
Slimefun, abbreviated as "SF" is a plugin that adds technology to a server without the need for the players to install a mod themselves. It adds several new materials and ways to obtain them, improvements and add-ons to vanilla Minecraft mechanics as well as convenient items. You received a Slimefun Guidebook when you first joined, if you lost it you can get another by doing the command /slimefun guide or open it directly from the Main Menu, opened by your "swap to offhand" key, default F or by doing the command: /slimefun open_guide. In there you will find several categories of items, machines and gadgets. To research each of them, you will have to pay an EXP price, or alternatively, you can ask someone who has learned multiple recipes to give you a Tome of Knowledge Sharing which they have bound to themselves. You still need to research the Tome yourself to be able to use it though, as is the case for all SF items like backpacks. While all SF items can be obtained normally, you can also find many of the base materials in the Shop, opened from the Main Menu or by doing /shop and going to the Slimefun category. This can be very useful for tedious materials, so keep it in mind. Lastly, the Guidebook also contains a search feature, as well as a link to the Wiki, which while not always useful can clear some misunderstandings.
General Roadmap
SF requires an infrastructure to be set up, otherwise some items are simply unrealistic or outright impossible to obtain. This section will outline a generalistic roadmap that you can follow on your road to a better quality of life while dabbling in technology and supply chains, as well as automation of tasks.
-
Getting Started:
This stage is the beginning of your journey. You have nothing to begin with but your Slimefun Guide and a willingness to learn (hopefully). In this stage, you will research essential items, machines, and structures, as well as build your basic infrastructure such as your first power grid and basic, manual machinery. -
Early Game
Your early game will consist mostly of upgrades. You will upgrade most of your vanilla Minecraft items to SF ones where possible, as well as small upgrades to your infrastructure, but mostly expansion. Here you will also get further or outright finish researching all the items in the SF Guide. While not necessary it is recommended. -
Mid Game
This is the most arduous part. Here you will have to make a very important decision, the decision of which energy generation system you will want to go with, as well as implementing that. This takes quite a lot of time and resources. In this phase, you will expand your infrastructure fully, including GPS and other systems. All vanilla items that can be upgraded will be upgraded. -
End Game
This is the last phase, where you will max out everything. Every machine will be upgraded to its highest tier, your infrastructure will be fully expanded and upgraded, as well as starting on complex automation and advanced farms, full use of androids, and infinite resources. While this is the most demanding phase from the point of view of materials, you will already have automated much of the processes, so the amount of work required is not too high, it's mostly a time investment at this point.
Getting Started
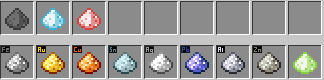
Starting out in SF can be quite daunting, but not to worry, it's not too difficult. Let's start with the basic materials. These are dusts, of which there is a variety. There are 9 main ones that you will want to obtain and amass vast quantities of. These are Gold, Zinc, Magnesium, Silver, Tin, Lead, Copper, Aluminum, and Iron.
While most of these are obtainable by mining, the most convenient method and the one by which you will be acquiring all of these will be gravel processing. This brings us to the machines you will need to research and build to start. All of these can be found in the Basic Machines category in the Slimefun Guide. You will need:
- an Enhanced Crafting Table
- a Grind Stone
- an Ore Crusher
- a Compressor
- a Smeltery (optionally an Automatic Ignition Chamber for it, but its effect can be obtained with just a dispenser filled with Flint & Steel hooked up to a fast redstone clock)
- an Ore Washer
- an Automated Panning Machine
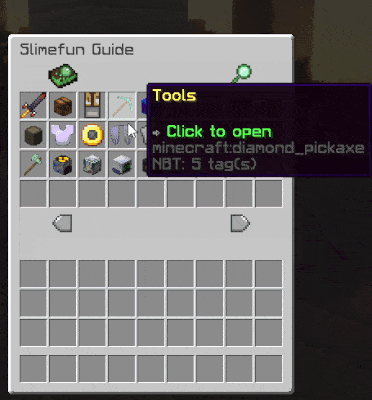
How to see the recipes
To see the recipe for a machine or an item open your slimefun guide book and click on the desired item. The middle part is the crafting recipe, the icon on the left will tell you where to recreate that recipe to craft it. In the shown example, place the items exactly as shown in the recipe in the Dispenser of an Enhanced Crafting Table, then right click the Crafting Table to craft the Enhanced Furnace. You can also click the components of the crafting recipe to learn more about them.
It is highly recommended to get the materials for an Advanced Industrial Miner as well, this is an invaluable tool and you will be using it forever, for now fueling it with lava buckets. Just get yourself a bunch from the Nether and take them with you as you randomly teleport with /rtp, build your Miner on the spot and fuel it. You can carry the Miner's chest with a Dolly for convenience!
Now let's go over the basic production chain you will have. You start with cobblestone or gravel, obtained usually from mining. If you start with cobblestone you will need to first pass it through the Grind Stone to turn it into gravel. Now you pass all the gravel through your Automated Panning Machine. I recommend setting up an auto clicker for this. From the Panning, you will get one of four possible items, clay which is considered waste, flint (8 of which can be used in the Compressor to recycle 1 cobblestone), an iron nugget (9 of which can be crafted into an iron ingot), and the most important one of them all, Sifted Ore. This Sifted Ore must be passed through the Ore Washer to obtain the base dusts discussed earlier. In terms of vanilla Minecraft resources, try to always obtain the ore instead of the item (i.e. Diamond Ore instead of Diamonds), as passing them through the Ore Crusher will double the drops from them. If you built the Advanced Industrial Miner, you will see that it always only gives you the ore, so you can just pass it through the Ore Crusher directly. Also, consider looking into an Enhanced Furnace, but I wouldn't go higher than Tier II at this point. Optionally, from the Energy and Electricity category, make an Energy Regulator and several crafts of Energy Connectors, you can never have enough of those. These will get you familiarized with the basics of SF and allow you to progress to the Early Game!
Early Game
This section outlines the upgrades and expansions that should be done next. Firstly, it is strongly recommended to set up an auto-clicker at this point if you haven't yet. This will be extremely useful. Now, having set up your basic production chain, it's time to expand it and move on from these manual machines, as well as getting yourself a bunch of convenience and comfort items. While you should try to research everything in the Guide, here's what's worth it and what isn't. Of these feel free to craft whatever you think would be useful or cool to have. If it isn't mentioned here, it's probably not worth the materials, in my opinion! Play the game however you like, try all the items out if you want to!
- From the Useful Items category: the Portable Crafter and Dustbin, the Backpack (all tiers, the higher the better of course), the Cooler, and the Tape Measure
- From Basic Machines: the Output Chest, all of the Technical Components, all of Talismans Tier I (don't craft any of them by themselves, only to use as materials), all of Ender Talismans Tier II (they're a pain to craft, but I recommend getting the Angel, Wise, and Whirlwind ones, as once you craft them you never need to recraft them and they are quite useful)
- From Magical Gadgets, the Magical Zombie Pills, the Infused Magnet, the Tome of Knowledge Sharing, the Flask of Knowledge (only as an ingredient), the Ancient Pedestal and Altar, and the Infused Hopper (this one is a godsend, it can suck items through the floor allowing for really cool farms)
- From the Fluffy Machines, all items from the Fluffy Barrel subcategory (a note: don't go overboard, they cost significantly more to make the higher up you go, for most applications anything above the Small Barrel is likely realistically excessive), all items from the Misc. subcategory, all of Energy and Electricity, all of the GPS-Based Machines, all of Cargo Management.
Again, I recommend trying to research everything and getting yourself some cool gadgets.
Now on to your first power grid. Firstly, make sure you have one Energy Regulator, as well as plenty of Energy Connectors. The connectors say they have a range of 6 blocks, to be precise you can leave 5 blocks of space between them, as in <1 connector> <5 blocks> <1 connector>.

They do not work diagonally, but they don't care what blocks, if any, are between connectors. For your first generator, I recommend making a Coal Generator Tier II as it uses normal furnace fuel, which is plentiful but be advised it uses quite a bit. Once you get this, it's time for upgrades! No more manual machinery (you will still need to move the items yourself unless you want to invest in Cargo Nodes already, which I do not recommend yet as they are very expensive, hoppers do not work). So from the Electricity category, make an Electric Gold Pan Tier II, an Electric Dust Washer Tier II, and an Electric Ore Grinder. I'm very specific with the tiers here, as your Coal Generator II produces 30J/s and these machines combined will be using 26J/s, these being the best tiers you can get for now. However, these will replace a lot of your old manual machinery. You can also invest in an Electric Furnace if you're interested, but you will only be able to use the Tier I one, as the others would go over your energy budget. You can power the higher Tier ones for short periods by making a Capacitor, your choice of tier, think of them as batteries. Of course, the other alternative is to just make sure you're not using the other machines while the Furnace is running.
Now, let's take a look at your new production chain. First, cobblestone goes into the Electric Ore Grinder to be turned into gravel. The gravel goes into the Electric Gold Pan to be turned into the four possible products (you need to babysit this machine if you don't have Cargo Nodes). The Sifted Ore goes into the Electric Dust Washer to be turned to dusts! If you want Cargo Nodes, which I understand, please refer to the Mid Game section as they are detailed right at the beginning.
This concludes the Early Game! You now know the basics of electricity, hopefully have most of the Guide researched, and are ready to amass the mountain of materials needed for the Mid Game. Well done, I'm very proud of you. ❤️
Mid Game
This section expands on the Early game. Here I will detail the full infrastructure you will need, as well as energy production. Firstly, let's talk about Cargo Nodes. If you haven't already gotten them, you will need to now. Four items are essential in a cargo system, the Cargo Manager, the Cargo Node (Connector) referred to as the Connector Node from here on, the Cargo Node (Input) referred to as the Input Node from here on, and the Cargo Node (Output) referred to as the Output Node from here on.
You will need one Cargo Manager and several of the rest. The Input Node must be connected to the source from where the items should be taken. It has several settings, let's take them one by one.
- The Type setting allows you to choose between Whitelist and Blacklist. Whitelist means only the items placed in the 3x3 area on the left are taken, while Blacklist means all items EXCEPT the ones in the area are taken. This is useful for sorting purposes.
- Next up is the "Smart Filling" Mode, don't use it. That's all.
- Next up is the Round Robin Mode. This mode is very useful if you're trying to divide the output equally to multiple places. For example, if you have an animal farm that produces raw meat, instead of making a normal super-smelter you can take one input from the farm's chest and use this mode to distribute the meat equally in all your furnaces.
- The Include Lore option should generally be kept Off, but it has some niche uses for example if you want to sort for certain enchantments through several items (the items must have the same durability).
- Lastly, the Channel ID setting. This is a very important one. Essentially, a Cargo Manager will allow up to 16 channels. When you select a channel in the Input Node, you must select the same channel in the Output Node, and while it's okay to have multiple Output Nodes on the same channel, especially when using Round Robin Mode, it's usually undesirable to have multiple Input Nodes on the same channel, but entirely possible and with niche uses, such as needing to Whitelist / Blacklist more than 9 items at a time.
Output Nodes only have Channel ID.
To use Cargo Nodes, you must place the Input or Output Nodes directly on the side of the desired container/machine. It will not work on the top or bottom. Due to this, double chests offer up to 6 positions for Nodes whereas single chests and most machines only offer 4. This is it basically, but this brings us to storage.
At this point, all of your dusts should be stored in individual Fluffy Barrels. These are containers that only store one type of item at a time, but truly vast quantities of it. I recommend the Small Fluffy Barrel, as it is the perfect compromise between the capacity and difficulty of crafting. I recommend buying the 8 Reinforced Alloy Ingots the Plate requires from the Shop, as they're very tedious to make. If you need more space than this for something, that's impressive. If you have any farms that you want to never have to worry about storage capacity again, upgrade those to use Fluffy Barrels as well.
Now to the hard part. The energy production question. There are 3 big ways of producing electricity in SF, each with its ups and downs, that I will outline next. Choose one, and build it.
- Fossil Fuels
I do not recommend this type. Its advantages are that it is by far the easiest and cheapest to set up, as well as running on fairly abundant materials, those being mostly Coal, optionally Lava, and/or Oil / Fuel. Its disadvantage is that it's a material-devouring monster. You will probably need to set up a sizeable Wither Skeleton farm, from Spawners or a vanilla one, to be able to feed it without having to constantly go out for Industrial Miner runs. This type is achieved simply by having a big stack of Coal Generator Tier II, optionally in combination with Lava and/or Combustion Generators. - Nuclear
I would recommend this one. Its advantages are that it produces vast amounts of power as well as needing comparatively little maintenance. Its main disadvantage is that it is somewhat complicated to set up and needs an operational GPS to be able to fuel it. Also will require some modification to the production chain. This type starts as a Nuclear Reactor, see wiki for setup, and then will be upgraded to a Nether Star Reactor in the End Game. - Solar
I would recommend this one and is the one I currently use. Its main advantages are truly zero maintenance required, you make them and they run forever, which is great for someone lazy like me, as well as portability as I can just pick one up and plop it down somewhere else for some quick Oil mining or so. Its biggest disadvantage is that it is the most expensive of them all, it requires immense amounts of materials and you must make the last tier, Energized Solar Panels, for them to be useable all the time, since none of the previous Tiers work during the night. This type is achieved by crafting a cluster of Energized Solar Panels and placing them somewhere, I have 9 of them and am not using them anywhere near full capacity even during the night.
After choosing one and building it, you'll be done with energy generation. Do keep in mind you don't need to deploy it fully, for example just a few Coal Generators, one Nuclear Reactor, or one or two Energized Solar Panels are more than enough for now, even if later on in the End Game you will need more.
Next up, let's talk GPS. This entire system is optional to some degree, if you're using Nuclear Power it's a must, but is generally nice to have regardless. The GPS infrastructure has only one essential part, but on its own it is useless, this is the GPS Transmitter. To start with craft any Tier that you're comfortable with in terms of energy usage, you can always upgrade it later. To use it most effectively, build up to the height limit of the world with a 1 block tower, place one Energy Connector, 5 blocks, one Energy Connector, etc. to get power up to it, then at the height limit place the Transmitter. Now, to use it with Nuclear Power or to get Fuel (the item) for your Fossil Fuels power, you will need a Portable Geo-Scanner as well as a Geo Miner and/or Oil Pump. Keep in mind that Fuel (the item) can and should also be used for the Advanced Industrial Miner. The way to use these is to use the Scanner to scan a chunk (press F3 + G to show or hide chunk borders), then use the Miner for materials or the Oil Pump for Oil. I recommend taking a portable power source, solar panel, battery, etc., and doing /rtp to just find an untapped chunk.
Now for the subjectively coolest part of GPS, teleportation, you will need the GPS Control Panel, one GPS Marker Tool, a craft of GPS Teleporter Pylons, one GPS Teleporter Matrix, and one GPS Activation Device, your choice which one. Now you may ask, "Isn't this the same as setting a home somewhere?" and yes it is, but now you can set waypoints inside people's claims without permission hehe. Also, there is a limit on the amount of homes you can have, although the limit is pretty high.
Next up let's talk about upgrades. Now that your power grid can support it, you can upgrade the dust production chain if you want to, as well as optionally look into Electric Furnaces if you want to, although a Carbonado Edged Furnace is better than the Tier III Electric Furnace. Sadly, however, the smeltery is a special case. It is by far the fastest option for smelting dusts into ingots and making alloys, as well as being only one machine as opposed to the two it would take to electrify it, namely the Electric Ingot Factory and the Electric Smeltery, both of which are significantly slower even at the highest tier compared to the manual Smeltery machine, which has no processing time at all and can be extremely speedy with the use of an auto clicker. However, these two will allow automatization, whereas otherwise that would not be possible.
Hopefully, you will have upgraded your dusts production chain with Cargo Nodes by now, but if you haven't here's an example setup (mine), the channel will be abbreviated to ch for ease:
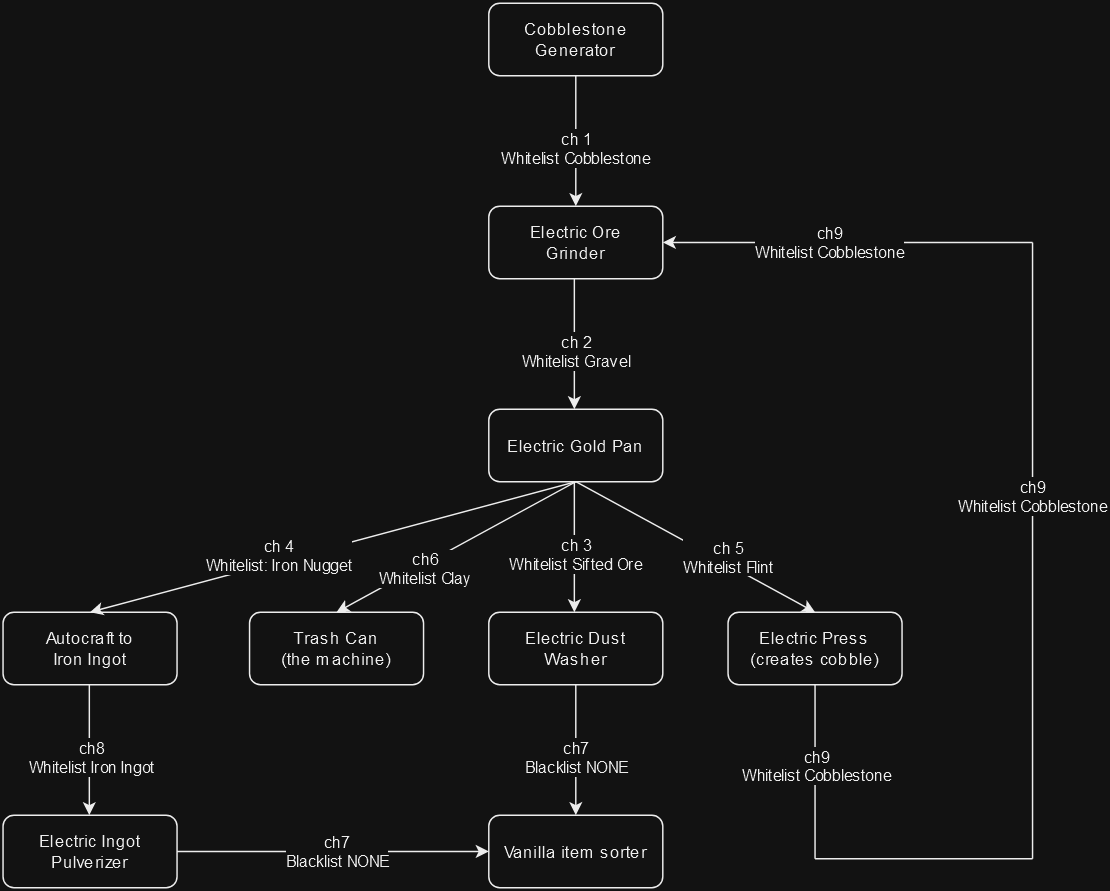
Cobblestone Generator (the machine) -> (ch1 whitelist cobble) -> Electric Ore Grinder -> (ch2 whitelist Gravel) -> Electric Gold Pan -> (ch3 whitelist Sifted Ore) (ch4 whitelist Iron Nugget) (ch5 whitelist Flint) (ch6 whitelist Clay) -> (ch3: Electric Dust Washer -> ch7 blacklist none to an item sorter) (ch4: autocraft to Iron Ingot -> ch8 whitelist Iron Ingot to Electric Ingot Pulverizer) (ch5: Electric Press to Cobble -> ch9 back to the Electric Ore Grinder) (ch6: straight into a Trash Can, the machine). Hopefully, this can give you a good idea of how a (my) production chain would look like for dusts, of course, this assumes you don't use Nuclear Power, in which case you can make some adjustments to get more Uranium.
Lastly, let's talk about some vanilla Minecraft upgrades. While the armor and weapons are not worth it, there are several items that make life easier, for example: the Dolly, the Concrete Factory, and the Animal / Tree Growth Accelerator (keep in mind these come with their own production chains). There are also fun items like the Helicopter Helmet, Jetpack / Jet Boots, etc.
This concludes the Mid Game! You now have a proper plan and implementation for energy production, a fully developed and mapped-out infrastructure, and many convenient and comfort items! I am extremely proud of you for sticking it out through this part, this being the most intense part of your SF journey, so well done, and keep at it. ❤️
Late Game
Here I will detail the final goals of SF, from complete automatization to upgrading everything.
- Firstly, make sure your power grid can produce enough electricity for both now and future expansions/projects.
- Next up, bring all your machinery up to its maximum tier, except maybe GPS if you don't use Teleportation. The time saved adds up rather quickly.
And now, finally, let's talk about androids and complete automatization. This involves the use of autocrafters quite often as it is an amazing feature. Androids come in many different types, but all of them require a Fuel Interface, and most require an Item Interface. You can fuel them in a variety of ways that you can see in the Slimefun Guide. Your choice of fuel is quite important. While all of them can be pulled off, they vary in convenience and ease. Coal is the only non self-sustaining one unless you get yourself a Wither Skeleton farm which produces heavily. Logs are inferior to planks, one log powers an Android for 2 seconds, while it can be crafted into 4 planks meaning 4 seconds of run time. So if you accept the cost, a Woodcutter Android will be self-sufficient as long as it's always cutting. The best fuel in my opinion is the Dried Kelp Block. They are easily passively farmed, and a simple production chain can infinitely stockpile fuel whenever you need it.
A sample: Kelp farm > temporary container as buffer > furnace (your choice of which kind, and how many you need depends on the size of your kelp farm, which depends on the number of androids you intend to run off it) > autocrafter to dried kelp blocks > Fluffy Barrel > Android Interface (Fuel).
You can use Androids in many ways for automation, one thing worthy of note is that Butcher Anroids are special, in that they behave as if the player killed the mob in question. This is important for certain farms such as Basic Circuit farms, as well as Wither Skull farms. This brings us to the next farm you can make now, the Wither farm.
You can make an enclosure for the Wither and let it suffocate to death with a simple setup, netting you infinite Nether Stars for any purpose, from simply selling them in the shop to powering your Nether Star Reactor. I will detail the setup next.
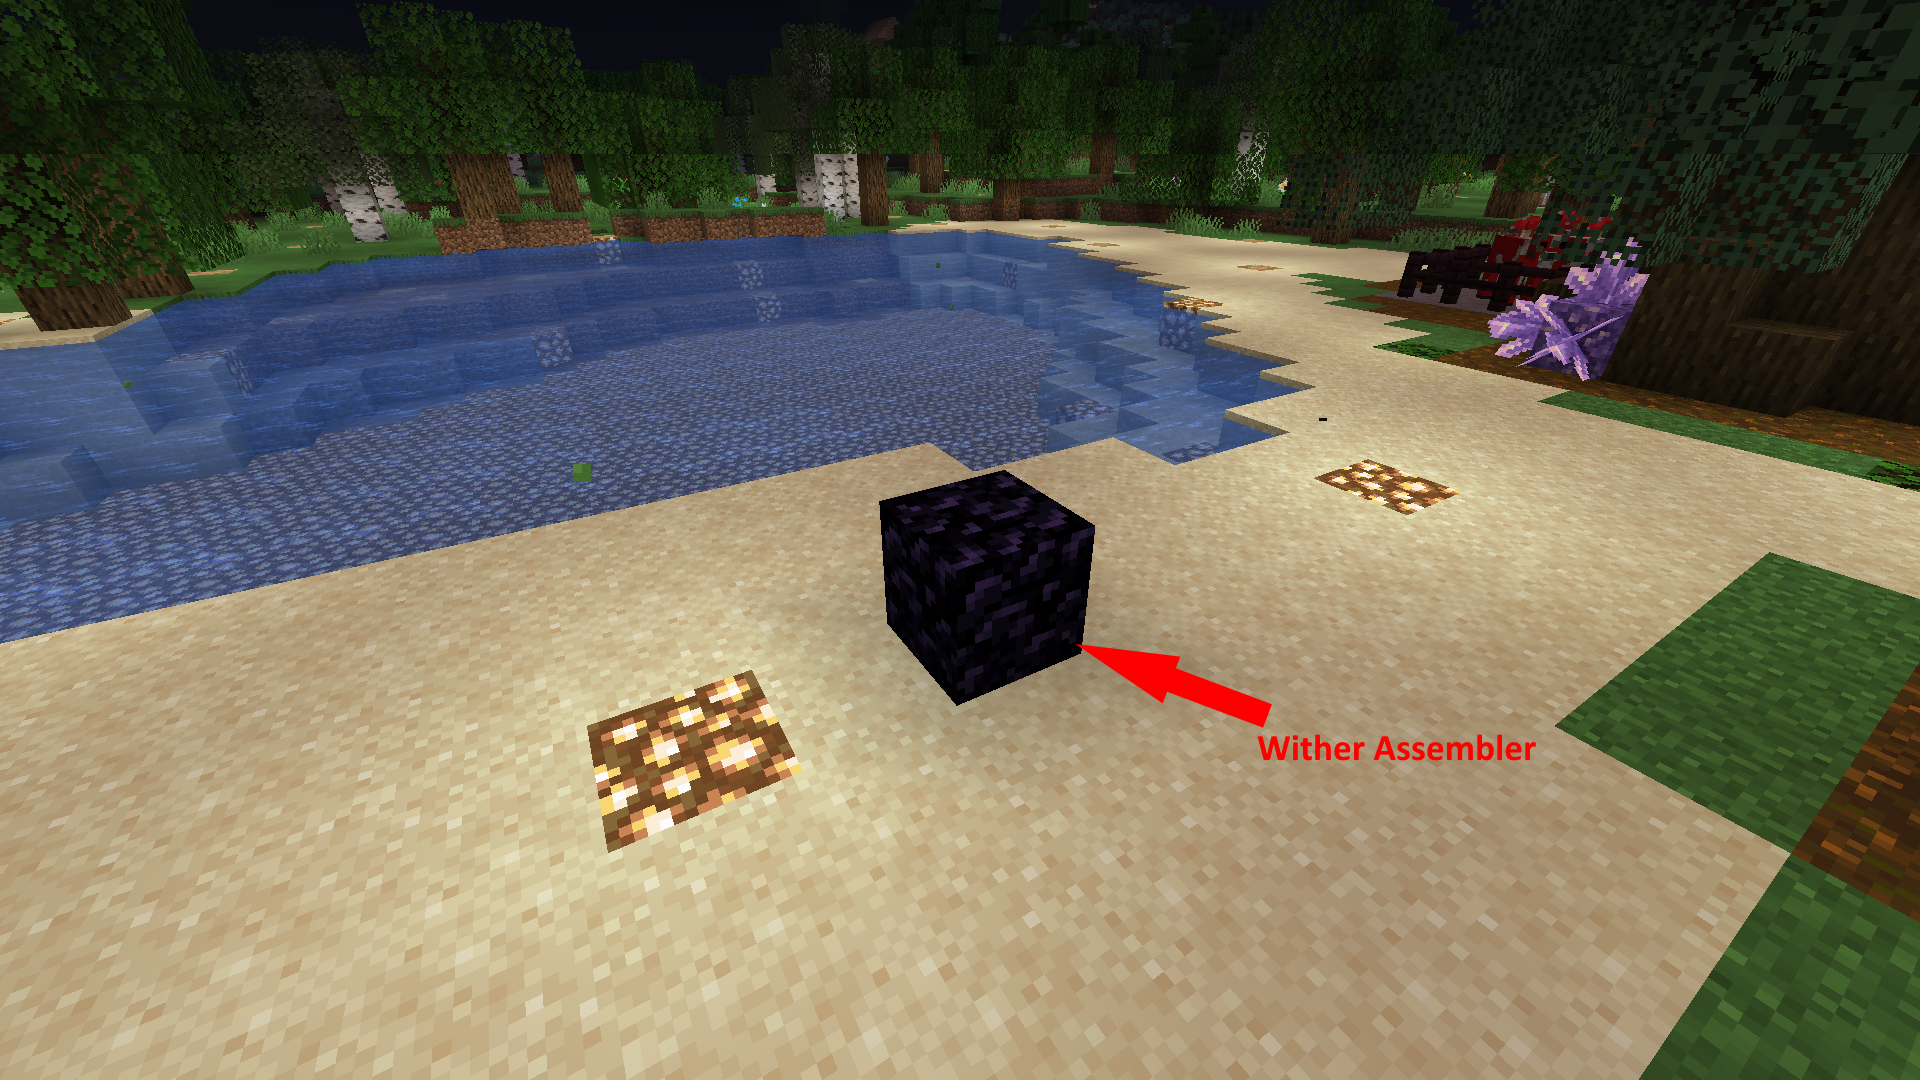
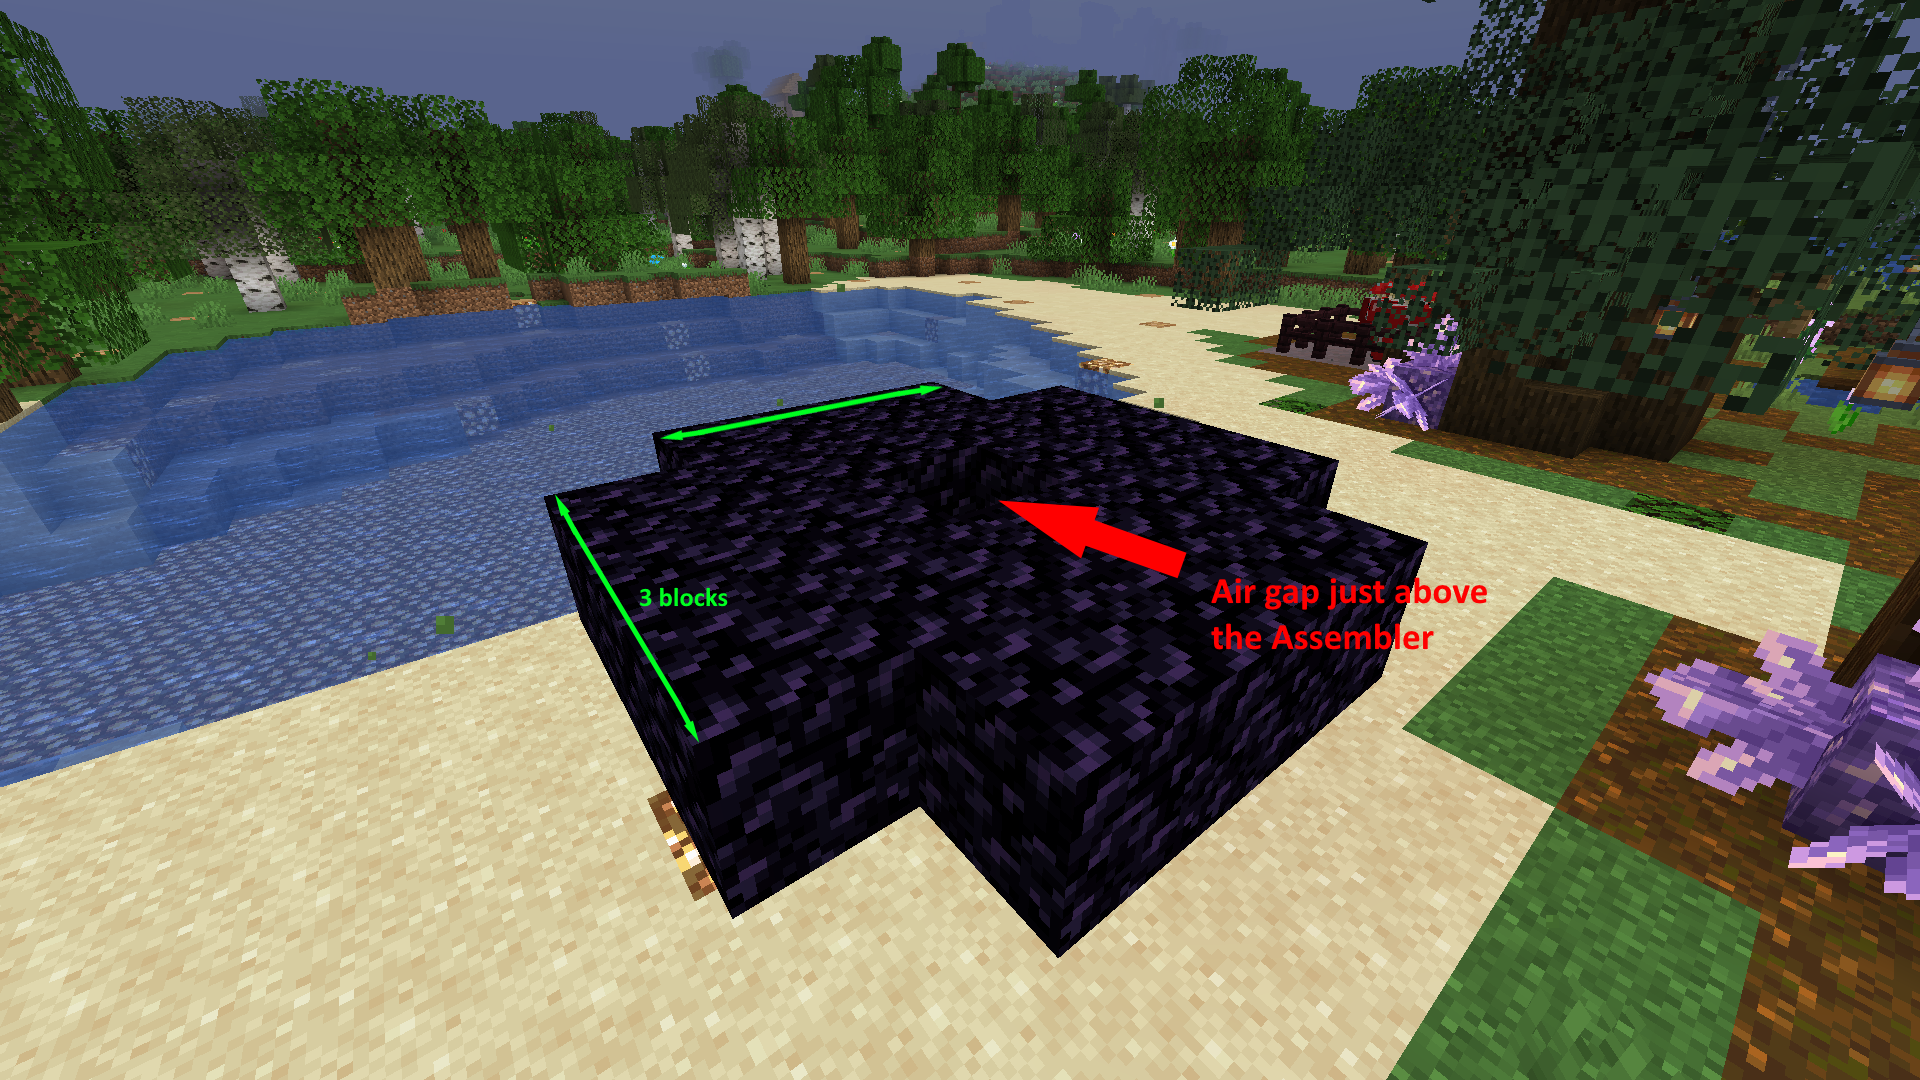
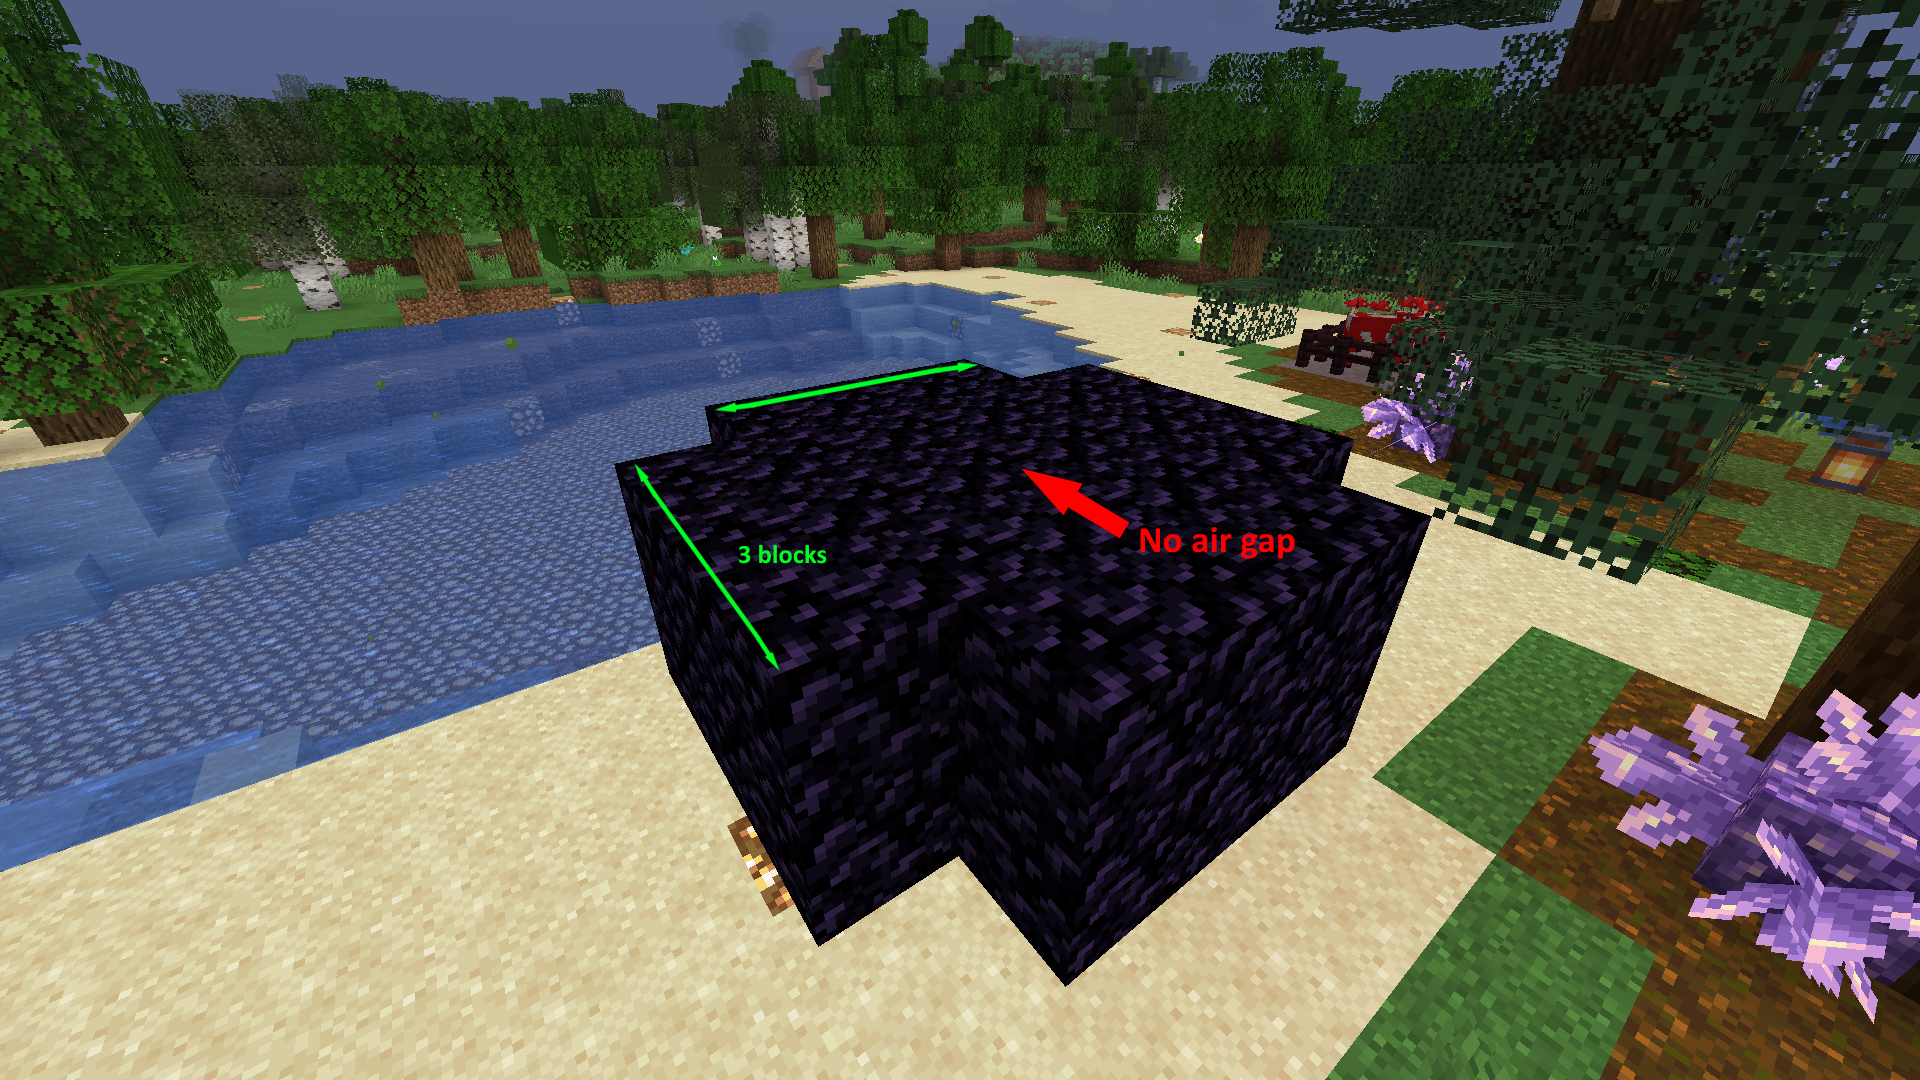

Wither Assembler settings: Offset +1.0 Blocks. And now for the production chain for infinite Soul Sand: Cobblestone Generator (the machine) > Pulverizer (you get sand) > Electric Composter II > Wither Assembler. And now you can get infinite Sould Sand!
This concludes the End Game! Congratulations, you did it! For now. Keep expanding, get bigger and better farms, more of them, make them more efficient, keep at it! You now have both the access to and the know-how on basically everything in SlimeFun! So keep at it, and well done ❤️
Tips and tricks
There are definitely some things that I wish I knew and learned embarrassingly late. These are in no particular order.
- Always make more than you need at the moment. Almost everything has more than one use, so you may very well need more. Specifically Magnets. Just make a lot of them.
- Use the /sfcalc calc {item} a lot. It will calculate the number of base materials you need for the given item. However do know that it's not perfect, sometimes it will make some small mistakes, especially with what it considers a base material.
- Some items are far more worth it to buy than make yourself. Some examples include Redstone Alloy Ingot, Reinforced Alloy Ingot, Carbon Chunks (they're very cheap but very annoying to make), and maybe Basic Circuit Boards, but those can be obtained with a Butcher Android and a (bunch of) Iron Golem spawner(s).
- The wiki is 50/50 useless/useful. If you're slightly savvy with Minecraft, make your own local server with SF to test out stuff on it.
- Apart from the Scuba Armor for radioactive materials, none of the tools, weapons, or armor sets are really worth it on Unicornia, you're better off using Custom Enchantments on netherite / Unicornia items as they are more powerful.
- Sometimes the plugin breaks or has issues, the most common being that when breaking a machine you will receive the normal block instead. Ping
@kirinin the#mc-supportchannel on Discord and it will be solved. - The fastest way to get ingots is the manual smeltery. The electric ingot machine is incredibly slow comparatively.
- Use an autoclicker! Especially for spamming right-click to make stuff in manual machines.
This concludes the tips and tricks I have (for now)! I hope these helped you ❤️